Microblading! I’m sure you’ve all been hearing about it, but you may not be quite sure what it entails, and you’re smart to be doing your research.
In this review, I’ll be explaining the microblading process to you. I will also share my experience having had it done personally and show you my before and after pictures.
What is Microblading?
 First things first, microblading, outside of the newest trend in beauty, is a semi-permanent make up technique that helps to “create” eyebrow hairs.
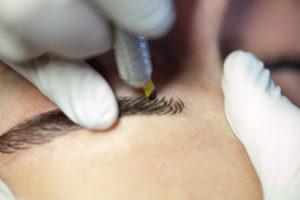
The individual hair strokes are created by a small blade that is dipped in cosmetic pigment to match your hair color.
It’s different from tattooing in that this is a manual process, not a machine depositing the pigment. The pigment can fade, however, similar to a tattoo.
The tool they use which I mentioned is a small blade that they dip into the pigment and then basically use that blade and drag it on your skin to create “hair”.
It’s manual, so there’s no gun type of thing. It’s like a metal stick with a tiny blade at the end, lol. It does look like 3D hair.
Who is a Good Candidate for Microblading?
Let’s talk about why you might have a microblading procedure performed on your brows.
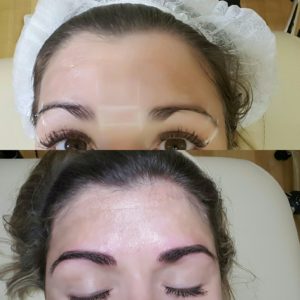
Personally, I’m not missing all of my eyebrows, but I did have sparse areas that I was always filling in with a pencil or powder.
I will admit, there was a time that there was an over plucking problem with me too. I blame the thin eyebrow trend in the 90’s!
This procedure is good for those of us who have over plucked, who want greater definition of your brows, people who have little to no hair, or very light hair.
Microblading will help fill in all that we have lost or wish to fill in without looking like we’re drawing on brows.
I am sure we all have a friend or two that we know who has been waiting for this process and technique or who may have questions or hesitations, I know I did!
It is recommended before your procedure to avoid alcohol and caffeine, do not take ibuprofen, avoid the sun, and no intense facial treatments two weeks before.
Your microblading procedure should be fully explained along with these do’s and don’ts prior to your appointment.
Where I Had Microblading – A Brilliant Beauty (Orlando, FL)
I met Tracie Cervero at A Brilliant Beauty through a friend of mine. Tracie is a triple threat – an accomplished makeup artist, hairstylist and microblading guru.
You are welcome to visit her website for additional information and photos that she’s taken of clients before/after (www.abrilliantbeauty.com).
Details About My First Microblading Appointment – Does it Hurt?
The day of my appointment started out with a lot of measuring, marking and calculations.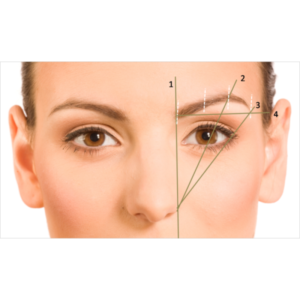
This will act as a road map of sorts for your artist. You do not want uneven brows!
You will be laying down on a table, and will have a lot of lights around to make sure your face is illuminated.
When all the final markings are made, you will get a numbing cream applied to your brows to make the process less painful, which will stay on for a few minutes before beginning.
Each individual “hair” stroke will be applied and I will be the first one to tell you, it does hurt.
There will be some areas that are more sensitive than others, but you will 100% feel it, and it will not be comfortable.
One of the things that made me feel good about my procedure was when Tracie had me sit up a few times to ensure that she wasn’t missing spots and that both brows were matched up as best as possible.
Plus, pausing to sit up and see for yourself what the process is and how different your brows start to look is amazing!
It was nice to have someone who is a perfectionist sculpt my brows! You will feel better knowing that you will walk out of your appointment looking great.
When Tracie was done with the first brow, I did have her apply some more numbing cream to the opposite side before beginning again (it hurts y’all).
I would recommend bringing headphones or playing your favorite music. That may not work for you, but it helped me relax.
How Long Does Microblading Take?
The entire microblading process start to finish should take around two hours. This will also depend on how much you are having done.
If you are completely missing both brows, or have little to no hair, the process could be longer.
How Much Does Microblading Cost?
The average cost is around $300 and that’s what I paid. The good thing about Tracie was that number included the follow up appointment, some folks charge for that too!
Microblading Follow Up Appointment
Microblading is a two-step process. You will schedule your first appointment, and then before leaving you will schedule a 4-6 week follow up. The follow up is for perfecting the brows, touching-up the shape or re-stroking certain hairs.
This second appointment is essential because it helps to complete the process. This second appointment ensures that your brows will maintain their flawless look, color, and definition.
How Long Do the Results of Microblading Last?
There are factors such as skin type, skin condition, and environmental exposure (such as to the sun, chlorine and salt water) that will all play a role in ink retention.
The procedure should not require additional touch up for 12 to 18 months. This will all depend on you individually and your skin.
Microblading is considered a semi-permanent procedure unlike the permanent “tattooed-on” skinny brows of the 90’s but it’s not guaranteed to fade completely, because it is pigment being deposited underneath the skin.
Microblading can last anywhere between one year to three years.
Microblading Post Procedure – What to Expect
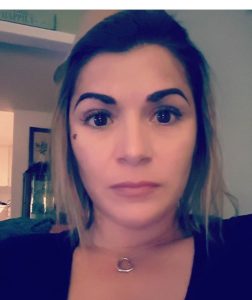
Let’s also talk a bit about post procedure and what to expect. I mentioned it before, but your brows will appear a lot darker than what you may expect, so don’t freak out.
I remember thinking I looked like Groucho Marx! This is to be expected as the pigment is new; it needs time to heal before you see the final results.
You should not work out, or do any exercise that would make you sweat. No swimming, no sports, no creams especially those which contain Retinol, and no saunas (you get the no sweating piece). Let those brows set, girl!
I would be careful of the area in general the first few days, as you do need time to heal. The evening that the procedure is completed, wash the brows gently with antibacterial soap.
It’s recommended that you keep your brows moisturized. I personally used coconut oil for the first few days applied with a cotton swab. Aquaphor was another product recommended for post procedure use by Tracie.
You may experience itching and flaking of your brows, but the application of the oil or Aquaphor will help to minimize this and it’s totally normal.
I did not have much flaking after my first appointment, but I did have it after my six week session.
Microblading Final Results – You’re Going to Look Amazing!

Once you have completed those two steps in your microblading journey, you should be looking fantastic, ditching the powders and pencils and carrying on with your fabulous brows!
I couldn’t be happier with my results. I referred two friends to Tracie after my experience, and both of them are ecstatic with their results.
It’s a life changer for some people, and even though there is a bit of discomfort, I would do it again.
I hope this helps to explain the process a bit better and assists your decision in taking the next step towards amazing brows. You will not be disappointed!
Do you have questions or comments about Microblading? Leave them below!
Q: Can I go tanning if I’m getting my eyebrows done tomorrow? –Brittany
A: Hi Brittany, any excess sun exposure is not a good idea after any type of laser or facial treatment as your skin will be very sensitive. Are you talking tanning bed or beach? I would never use a tanning bed (eek) and if you’re going to the beach be sure and wear SPF 50, a hat and sun glasses and sit under an umbrella 😉 I’m 46….and I can tell you I’d probably look 56 had I used tanning beds. I know it’s nice to have a tan, but get a spray tan. Please protect your skin. You’ll remember my advice when you hit 40 😉 Not trying to preach but you’ll extend your youth if you avoid excessive sunning/tanning. I play beach volleyball and it sucks to have to wear an spf shirt, but I want to look GOOD in a strapless dress…. and I could care less how I look playing the sport I love. Anyway I guess I’m preaching, I’m sorry I can’t help it! Take care and good luck! Rachel
Was this question helpful to you?
Thank you for your feedback.
Q: I just had my 8 week retouch of micro shading. I have an antibiotic ointment to apply a few times a day. I also make my own CBD Pain Cream. I was curious if this would be good to use also. After googling inseenitnhas powerful anti bacterial, anti inflammatory properties plus pain management. And some even said it was more effective than the neosporin type ointments. I was thinking of using my CBD Pain Cream which has coconut oil, Shea butter and some essential Oils too like camphor, peeprmint and lavender. Your thoughts? –Noelle
A: Hi Noelle, it’s best to use very minimal, non-irritating ingredients post procedure. Camphor, peppermint and lavender would all be irritating, especially camphor. You could try it and see how your face feels, but if you experience any redness or stinging I would wash it off immediately and do some cool compresses. I personally would not use any essential oils post treatment.. The CBD pain cream you’re talking about is best for sore muscles, tendonitis, things like that (I use a CBD topical gel for pain but would not use it on my face). I would stick to your ointment or get some aquaphor. Good luck! Rachel
Was this question helpful to you?
Thank you for your feedback.
