
Braids have been a timeless hairstyle choice, celebrated for their versatility and ability to transform any look. Whether you’re attending a formal event, going on a casual outing, or simply looking to add some flair to your everyday style, braids offer endless possibilities. From simple three-strand braids to intricate Dutch braids and fishtail styles, mastering the art of braiding can elevate your hair game significantly.
In this article, we will explore the history of braids, delve into different types of braids, and provide a step-by-step guide to creating stunning braided hairstyles. We’ll also discuss tools and products that can help enhance your braiding experience, as well as tips for maintaining braids for longer periods.
The History of Braids
Braids have been around for thousands of years, with evidence of their use dating back to ancient civilizations such as Egypt, Greece, and Rome. In many cultures, braids held symbolic significance:
- Egypt : Braids were often adorned with beads and jewelry, symbolizing status and beauty.
- Africa : Different braid patterns were used to signify tribe, marital status, age, and social standing.
- Native American Tribes : Braids were not only practical for keeping hair neat but also had spiritual and cultural meanings.
Today, braids are celebrated worldwide for their aesthetic appeal and functionality. They are a popular choice for both men and women, transcending cultural boundaries and becoming a staple in modern fashion.
Types of Braids
Before diving into the how-to, let’s explore some of the most popular braiding styles:
- Three-Strand Braid
- The classic and most straightforward braid, perfect for beginners.
- Divides hair into three sections and alternates weaving them over each other.
- Dutch Braid
- Similar to the three-strand braid but incorporates an “under” technique, creating a more intricate pattern.
- Often used as a foundation for more complex styles like French braids.
- Fishtail Braid
- Known for its delicate, interwoven appearance.
- Starts by dividing hair into two sections and gradually adds small strands from one side to the other.
- French Braid
- Combines elements of the three-strand and Dutch braid techniques.
- Incorporates additional hair from the sides as you weave, creating a fuller braid.
- Boxer Braid
- A male-friendly style that involves twisting hair into a single strand and securing it at the base of the neck.
- Popular among athletes and those seeking a low-maintenance look.
- Crown Braid
- A circular braid that starts at the front of the head and wraps around the crown, ending at the nape.
- Adds volume and drama, making it ideal for special occasions.
- Waterfall Braid
- A cascading braid that flows down one side of the head, resembling a waterfall.
- Perfect for long hair and creates a romantic, bohemian vibe.
Step-by-Step Guide: Creating a Stunning Braided Look
Tools You’ll Need:
- Hairbrush or comb
- Bobby pins
- Elastic hair ties
- Hair spray (optional)
- Leave-in conditioner or oil (for added shine and protection)
Instructions:
- Preparation
- Start with clean, detangled hair. Use a leave-in conditioner or oil to prevent frizz and make braiding smoother.
- If your hair is naturally curly, consider straightening it slightly for easier braiding.
- Sectioning
- Divide your hair into manageable sections depending on the braid style you want to achieve.
- For a three-strand braid, divide your hair into three equal parts.
- For a Dutch or French braid, start with a smaller section near the front of your head and gradually incorporate more hair as you move toward the back.
- Begin Braiding
- For a three-strand braid: Cross the left section over the middle, then cross the right section over the new middle section. Continue this pattern until you reach the end.
- For a Dutch braid: Instead of crossing sections over each other, pull one section under the other, alternating between “over” and “under” movements.
- For a fishtail braid: Start with two small sections and gradually add small strands from one side to the other, creating a zigzag pattern.
- Secure the Braid
- Once you’ve reached the desired length, secure the braid with an elastic hair tie.
- Add a few bobby pins along the way to ensure the braid stays intact.
- Styling Tips
- Spritz hair spray lightly to keep the braid in place, especially if you plan to wear it for an extended period.
- Consider adding accessories like hairpins, beads, or ribbons to enhance the look.
Maintenance Tips for Long-Lasting Braids
- Use Protective Products : Apply a lightweight serum or oil to your hair before braiding to prevent dryness and breakage.
- Sleep Smart : Use a silk or satin pillowcase to reduce friction and minimize damage while sleeping.
- Avoid Over-Manipulation : Try not to touch or adjust the braid too frequently, as this can lead to loosening.
- Reapply Holders : If your braid starts to loosen, reapply bobby pins or elastics to reinforce it.
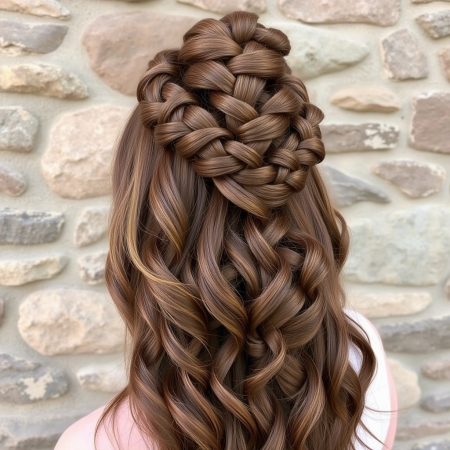
Inspirational Braided Styles
To inspire your next braiding session, here are a few ideas:
- Half-Up, Half-Down Braid
- Combine a high bun with a cascading braid for a chic, versatile look.
- Double Fishtail Braids
- Create two fishtail braids on either side of your head for a symmetrical, eye-catching style.
- Side-Swept Crown Braid
- Style a crown braid to one side for a dramatic, asymmetrical effect.
- Color-Blocked Braids
- Experiment with highlights or ombre coloring to add dimension to your braids.
Conclusion
Braids are not just a hairstyle; they are an art form that allows you to express creativity and individuality. Whether you’re a beginner or an experienced braider, there’s always room to explore new techniques and styles. By following the steps outlined in this guide and experimenting with different variations, you can master the art of braiding and create stunning looks that suit any occasion.
Remember, practice makes perfect. Don’t be discouraged if your first attempts aren’t flawless—each braid brings you closer to refining your skills. So grab your hairbrush, gather your tools, and let your imagination run wild as you embark on your braiding journey!